Crop, rotate, and restore document images during manual review in ABBYY Vantage to fix orientation, isolate documents, or recover the original image.
During manual review, you can perform a variety of image editing operations to ensure the accuracy and completeness of the document.
Any changes to the image remove all regions and require a new extraction.
Manually cropping document images
If automatic cropping did not work correctly, you can go back to the original image and crop it manually. Manually crop the image to:
Improve the appearance of the document.
Re-extract data from the document if part of the data was accidentally cut off in the document image.
Crop several images from the original page image. For example, you may need to crop document images from:
Several W2 tax forms.
Both sides of a driver’s license or two pages of a passport.
Multiple different documents for a single person, such as a driver’s license and an insurance certificate placed on a scanner and scanned together.
Multiple checks photographed together.
Cropping a document
1
Open the Crop Image action
Click the edit image icon in the toolbar and then select Crop Image in the Actions pane.
2
Draw one or more crop regions
Draw rectangular areas for one or more regions (if there are multiple documents on the page). Adjust their borders and corners.
3
Apply the crop
Click Apply Crop or press Enter. Each area becomes a separate page.
4
Save and close
Click Save & Close. The Client imports the cropped page image and runs standard import operations using the coordinates and orientation you specified.
5
Start extraction
In the window that opens, click Extract Data.
6
Split a multipage document (optional)
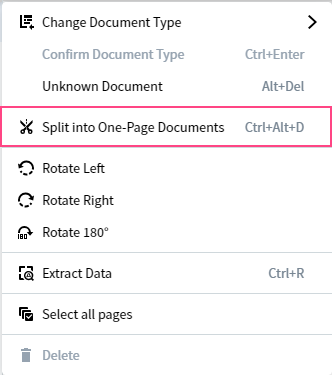
If you need to split a multipage document into separate documents, click the more options icon next to the document and select Split to One-Page Documents. Then click Extract Data in the window that opens.
Split to One-Page Documents option in the document more-options menu
Removing unwanted pages
When you crop out several images from a document, unnecessary pages may appear. To remove them, select the pages you want to delete and click the delete icon on the toolbar. Alternatively, click the more options icon next to the page and select Delete Page.
The document list cannot be empty — it must always contain at least one document. You cannot delete the last page of a document that is the only document in the list.
Changing the rotation of an image
The program automatically detects and corrects the orientation of a page. If needed, you can rotate pages manually using one of these methods:
From the toolbar — click the rotate icon to rotate 90°, or select Rotate Left, Rotate Right, or Rotate 180° from the drop-down list.
From the document list — click the more options icon next to a specific page or the whole document, and then select Rotate Left, Rotate Right, or Rotate 180°.
Restoring an image to its original appearance
Image enhancement operations applied when importing files to a document set may sometimes alter the original image in unwanted ways. You can revert the edited image to the original — for a single page or for all pages in a document. The reverted image appears without any cropping, distortion corrections, or other image enhancement operations.
Revert the current page
1
Open the edit image action
Click the edit image icon in the toolbar.
2
Select Revert Page Image to Original
In the Actions pane, select Revert Page Image to Original.
3
Save
Click Save & Close.
Revert all pages in a document
1
Open the more options menu
Click the more options icon in the toolbar.
2
Revert all pages
Click the edit image icon next to Revert Page Image to Original in the Actions pane.