Import email attachments (and optionally the email body) into Vantage from a Microsoft 365 mailbox through Microsoft Graph, a Microsoft account, or any other IMAP mailbox.
You can import email attachments from your mailbox into ABBYY Vantage, and optionally include the email body. The Input activity accesses a single email folder per skill.
After the skill is published, Vantage checks the specified email folder once per minute.
Vantage processes each new email as follows:
If the email contains attachments, a new transaction is created for all attachments in the email.
If email-body import is enabled, the email body is converted to HTML and appended to the same transaction. Vantage also processes first-level embedded emails and their attachments.
Vantage imports at most 50 emails per check. If more than 50 are waiting, it imports the 50 oldest and picks up the rest on later checks.
If throughput becomes a bottleneck, split the work across two skills, each with its own mail folder, so two agents pick up emails in parallel.
Vantage saves the following data to the transaction registration parameters:
Parameter name
Description
EmailSubject
The email subject.
EmailDate
Date and time when the email was sent, including time zone. Format: MM/DD/YYYY HH:MM:SS +/-HH:MM.
EmailSender*
The sender’s email address.
EmailAddressee*
The addressees’ email addresses, separated by commas with no spaces.
EmailCopyAddressee*
The copy addressees’ email addresses, separated by commas with no spaces.
* Vantage stores only the email addresses, not the sender’s or addressees’ names.
Vantage doesn’t create parameters with empty values. For example, if an email has no subject, the transaction won’t have an EmailSubject registration parameter.
Vantage saves the source type (MailImport) and the source file name to the SourceType and SourceFileName document registration parameters.To see document and transaction registration parameters, add the matching columns in the Transactions section of Skill Monitor.Vantage also exports them to the output JSON file, which you configure in the Exported Data section of the Output activity. Transaction registration parameters are available through the Vantage API as well.File names can’t contain the following characters, and Vantage replaces each one with an underscore when you upload the file: / : ? # [ ] @ ! $ & ' ( ) * + , ; = \. Vantage saves the original file names to the document registration parameters. Retrieve them using a Custom activity sample script.
If an attachment’s format is unsupported, the transaction fails and processing stops for all other documents in it. See the specific error in the Error log section of Skill Monitor.If an email has no attachments and body import is turned off, Vantage creates no transaction but still marks the email as processed.Vantage either permanently deletes processed emails or moves them to a folder you specify when you set up the mailbox connection. Emails that can’t be imported go to the exceptions folder you specify.
If an email imports successfully but the transaction fails, the email is placed in the Processed folder.
If Vantage can’t access the import folder, it records an error in the Error log section of Skill Monitor.
Before anyone in your organization can use Sign in with Microsoft Graph, a Microsoft 365 administrator runs a PowerShell script once. The script adds the ABBYY Vantage enterprise application to your Microsoft Entra tenant if it isn’t there yet. It then grants ABBYY Vantage the permissions it needs, on behalf of all users in the tenant.If you use only Sign in with Microsoft or Sign in with other email account, you don’t need to run the script.To run the script, you need an account with at least the Cloud Application Administrator role in Microsoft Entra ID. For more information, see Grant or revoke API permissions programmatically.
In PowerShell, run the following script. Replace <your-tenant-id> with your tenant ID. When prompted, sign in with your administrator account and accept the permissions that Microsoft Graph PowerShell requests.
Connect-MgGraph -TenantId "<your-tenant-id>" ` -Scopes "Application.ReadWrite.All","DelegatedPermissionGrant.ReadWrite.All"$appId = "084b980d-4a5f-4014-8309-6f8fe7187193"# 1. Create the service principal (Enterprise Application) if it's missing$sp = Get-MgServicePrincipal -Filter "appId eq '$appId'"if (-not $sp) { $sp = New-MgServicePrincipal -AppId $appId}# 2. Microsoft Graph's service principal in this tenant (always exists)$graph = Get-MgServicePrincipal -Filter "appId eq '00000003-0000-0000-c000-000000000000'"# 3. Scopes to grant, space-separated$scopes = "openid profile email offline_access User.Read Mail.ReadWrite Mail.ReadWrite.Shared IMAP.AccessAsUser.All"# 4. Create the grant, or update it if one already exists$grant = Get-MgOauth2PermissionGrant -Filter "clientId eq '$($sp.Id)' and resourceId eq '$($graph.Id)' and consentType eq 'AllPrincipals'"if ($grant) { Update-MgOauth2PermissionGrant -OAuth2PermissionGrantId $grant.Id -Scope $scopes} else { New-MgOauth2PermissionGrant -BodyParameter @{ clientId = $sp.Id consentType = "AllPrincipals" resourceId = $graph.Id scope = $scopes }}
The script grants ABBYY Vantage the following delegated permissions: openid, profile, email, offline_access, User.Read, Mail.ReadWrite, Mail.ReadWrite.Shared, and IMAP.AccessAsUser.All.If ABBYY Vantage already has a grant in your tenant, the script updates it. You can safely run the script again.
After the script finishes, users in your organization can connect their mailboxes with Sign in with Microsoft Graph.
Click the Input activity block in your document processing flow. If the flow has no Input activity yet, add one from the Activities pane.
2
Select Email as an additional source
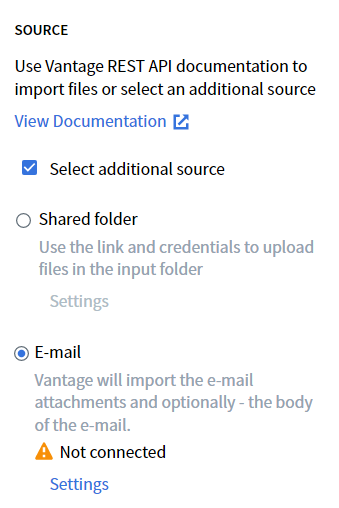
In the Actions pane, check Select additional source and choose Email.
Selecting Email as an additional Input source
3
Open settings and choose account type
Click Settings. The Input Settings: Email dialog box opens. Select an account type and click Continue.The account types are Sign in with Microsoft, Sign in with Microsoft Graph, and Sign in with other email account. Sign in with Microsoft Graph appears only when Microsoft Graph is enabled for your environment.
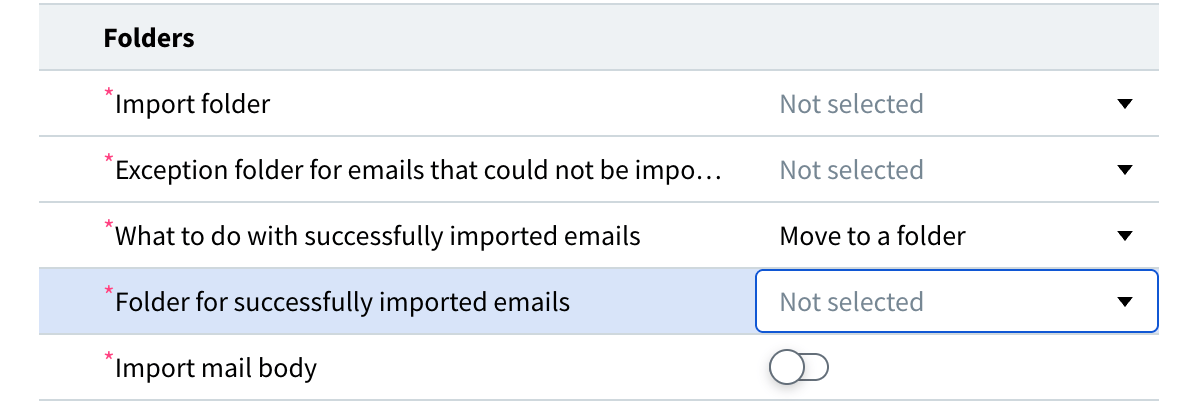
After you sign in, the dialog box shows Select required folders. In Import folder, select the folder Vantage imports emails from. In Exception folder for emails that could not be imported, select the folder for emails that Vantage can’t import.After you publish the skill, Vantage creates a VantageProcessing folder inside the import folder you specified. Emails move to this service folder first, and Vantage then processes them according to your settings.
Don’t select the same import folder used by another Process skill in your tenant. If multiple skills share an import folder, you can’t control which skill processes a given email.
6
Choose the action for processed emails
In What to do with successfully imported emails, select Delete to permanently delete processed emails. Delete is the default and needs no folder.To keep processed emails, select Move to a folder. A required field, Folder for successfully imported emails, appears. Select the folder to move them to.
Folder and post-processing settings in the Input Settings: Email dialog box
7
(Optional) Enable email body import
Import mail body is off by default. Turn it on to import the email body. Vantage converts the body to HTML and adds it to the same transaction as the attachments.
8
Save
Click Save. Vantage stores the settings and closes the dialog box.
The email address connected to the activity appears in the Actions pane when you select the Input block. Click Settings under the email address to view or change the current mail import settings. To disconnect the email account, click Sign out in the Input Settings: Email dialog box. Changes to settings take effect only after the skill is published.
Signing out of the email account resets all settings.
In the Microsoft sign-in dialog box, select your current account if you are already signed in, or use a different one. After authentication succeeds, the sign-in dialog box closes.The first time you sign in with a Microsoft account, Vantage asks for permission to:
Sign in to the app using a work or school account.
Access the primary email address and basic user profile data.
Access and update user details, even when the user isn’t using the app.
Access, update, create, and delete (but not send) emails in the user’s mailboxes.
Sign in with Microsoft Graph connects to a Microsoft 365 mailbox through the Microsoft Graph API instead of IMAP. It is the recommended option for a Microsoft 365 mailbox. There is no mail server address or port to enter.Before anyone in your organization can use this option, your Microsoft 365 administrator must run a one-time setup script. For more information, see Grant ABBYY Vantage access to Microsoft Graph.Sign in to the Microsoft account that owns the mailbox. After authentication succeeds, the sign-in dialog box closes and you continue to folder selection.Microsoft Graph imports the same attachment formats as the other account types, and processes them the same way.If sign-in succeeds but Vantage cannot reach the mailbox, the dialog box reports an HTTP 403. The account signed in, but it does not hold the mailbox permission Vantage needs.If the option is missing from the Input Settings: Email dialog box, Microsoft Graph is not enabled for your environment. Contact your ABBYY account team.
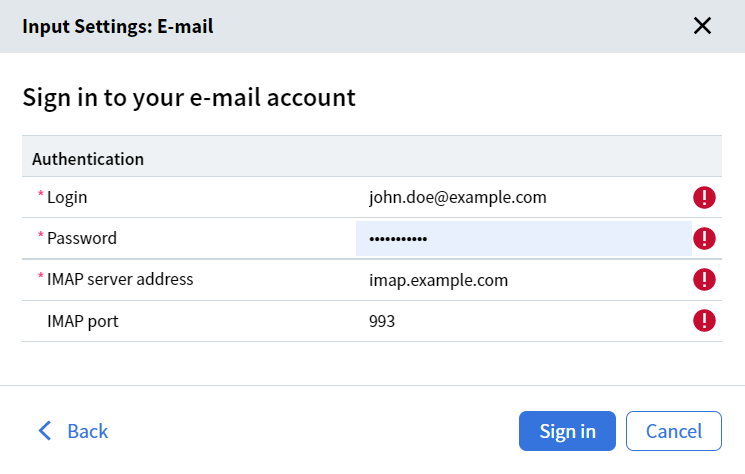
Specify your email address and password, the IMAP server address, and the IMAP port. The default port is 993 and rarely needs changing. Click Sign in.If Vantage can’t connect to the server, the account sign-in dialog box stays open and an error icon appears next to the input fields.
Email-connection error indicators in the Input Settings: Email dialog box
If all the details are correct, one of the following usually causes the connection error.
Cause
What to do
The email server blocked a suspicious sign-in attempt.
Check your email. If you received a notice about a blocked sign-in attempt, confirm that the attempt was yours.
The account is a Google account without two-factor authentication, and access for less secure apps is restricted.
Allow access for less secure applications, and confirm the Vantage access attempt if prompted.
The server requires an application-specific password.
Some services, such as Yahoo and Google with two-factor authentication, require app-specific passwords for third-party applications. Generate one by following the service’s instructions, and use it in the Input activity settings.
After authentication succeeds, the connected email address appears in the Input Settings: Email dialog box.